


The 'Adding Detail' tutorial is broken down into step by step sections. The first section is called 'Adding Detail to the Torso'. What this part of the tutorial covers is pretty self explanatory due to its title but this part of the tutorial covers how to add detail to the torso of the block out. This part of the tutorial starts off by pointing out some of the main bony masses and muscle masses that need to be shown in model in order to make the character look more believable. This is where knowledge of anatomy comes into play. It has now become apparent to me how important it is to know about anatomy when character modeling, so I definitely need to learn about anatomy. I followed this part of the tutorial by adding the correct edge loops to represent the Ribs, Pectoral muscles, the Spine, Latisimus Dorsi and Clavicle bone etc. I then pushed and pulled the vertices's to represent the reference image as best as possible. I also made some of my own adjustments when arranging the vertices's of my model to try and get the best results. I did this because despite my topology looking very similar to the topology of the model in the images in the book the topology of my model differed slightly. I needed to edited the vertices's of my model to correct the topology to best represent the reference image. The images below show what the completed torso of my game character model looks like, the images also show its topology and how the torso and its topology matches up with the reference images.


The next section of the tutorial is called 'Detailing the legs'. Again the title of this section of the tutorial makes it pretty self explanatory what this part of the tutorial will be covering. This section of the tutorial starts by explaining that even though you may be modeling the clothes straight onto the character it is still important to understand where all the main bones and muscles are in the leg. The tutorial then runs through some of those main bones and muscles that are found in the leg and points out the main muscles that the model should show. Again it becomes very clear to me how important it is to have some knowledge about anatomy. The main bony mass visible in the upper leg is the pelvis, you can also see the iliac crest where the leg meets the torso. The other main bones that are visible in the leg are the knee and the tibia. The main muscles that are visible in the upper leg are the vastus medialis, vastus lateralis, rectus femoris. The other main muscles that are visible in the leg are the gluteus maximus, adductor magnus and the biceps femoris. The main muscles that are visible in lower leg is the tibialis posterior, the gastrocnemius lateral head and the medial head. Going back to the skeleton and muscle anatomy diagrams in the book helped me a lot to understand where these muscles are located and how effect the shape of the body. This helped me when following the tutorial and adding detail to the leg.
The next part of the tutorial is called 'Creating the Feet'. Luckily the character is wearing boots so I am not required to model a human foot that has different bones, muscles and has toes this means that I only have to model the boot. Their are two main benefits to this the first is I will not be required to know anything about anatomy to model a boot I just have to focus on making it look like a boot, the second benefit is a boot can contain much less polygons and still look like it should compared to a foot that needs more polygons because it contains more detail. However boots and shoes are made to fit feet so it is wise to know about the shape of feet as the shape of a foot can still be seen from the footwear. The tutorial shows what edge loops you need to insert and then explains that you should continue changing between different views of your model and pushing and pulling the vertices's of the model in order to make it look like the boot in the reference. This was a technique for organic modeling that I use to find very difficult and found was a never ending process. I thought this because I found that if you pulled the vertices of the model in the side view it can then mess up how your model looks from the front, so I use to keep on bouncing back and forth and could never quite get the result that I wanted. However all I think that I needed in order to conquer this was practice. This tutorial gave me the vital information and the practice that I needed in order to get to grips with the main technique of organic modeling. The images below show my finished result of the legs and the boots, they also show the topology of the legs and the boots and how they match up with the reference image.


The next section of the tutorial is called 'Finishing the Arms'. The tutorial establishes the main bones and muscles that you need to know about in order to make the arm look believable. It explains how you need to make sure these bones and muscles are visible in the model. The main bones in the arm are the elbow, the radius and ulna bones. The main muscles in the arms are the deltoid, the bicep, the triceps, the brachioradialis, the flexor carpi ulnaris, the extensor digitorum and the extensor carpi radialis longus. I then followed the tutorial, I added in the correct edge loops and moved the vertices to match the reference images, again constantly changing my view of the model to make sure the arm looks correct from all angles. I found adding detail to the arm was the easiest part of the 'Adding Detail' tutorial so far. I was particularly happy with the shape of the bicep and the elbow in my models arm as I felt these details made my arm look very believable. The images below show the finished arms. The images also show the topology of the finished arms and how the arms match up with the reference image.


The next section of the 'Adding Detail' tutorial is called 'Creating the Hands'. I found this the most challenging part of the tutorial so far. The tutorial stated that the hands can be fairly difficult to detail, so I expected it to be more challenging. This section of the tutorials starts off like all of the other sections by explaining the anatomy of the hand and pointing out the main bones and muscles that need to visible in your model in order for your model be more believable. The section of the tutorial points out that extra detail will need to be added to the back side of the hand. The main part of the hands which definitely need to be included on the model are the knuckles. Another bone that the hand has that you should include in your model is the trapezium bone which is located at the base of the thumb. Then the palm of a hand has a few predominant muscle groups, these are the thenar muscles, the hypothenar muscles and the lumbricales muscle. The tutorial then starts by telling you to round off the thumb and finger. You then have to add some relevant edge loops, followed by extruding and shaping the knuckles on the finger and hand. The next part was one of the hardest parts to do, you duplicate the finger that you have already created three times, you now have all of your fingers so you have saved a lot of time however the hard part is making sure that the vertices of each finger match up with the vertices's on the hand. You have to scale and edit the other fingers slightly to make sure they fit, you then combine the fingers with the hand and merge the vertices. The next step it to create the knuckles on the thumb. I then continued to try and improve the hand by moving the vertices to try and best match the reference images. Overall I am fairly happy with how the hands look but I noticed that some of the fingers are too close together. Unfortunately I do not have enough time to re work the fingers that are too close together but for now they look fine. I think that some of the fingers being too close together will only be problematic if you were to rig this character, other than that I personally think the hands and fingers looks fine. The images below show the finished hand. The images also show the topology of the hand and how the hands match the reference images.


The next section of the 'Adding Detail' tutorial is called 'Creating the Hands'. I found this the most challenging part of the tutorial so far. The tutorial stated that the hands can be fairly difficult to detail, so I expected it to be more challenging. This section of the tutorials starts off like all of the other sections by explaining the anatomy of the hand and pointing out the main bones and muscles that need to visible in your model in order for your model be more believable. The section of the tutorial points out that extra detail will need to be added to the back side of the hand. The main part of the hands which definitely need to be included on the model are the knuckles. Another bone that the hand has that you should include in your model is the trapezium bone which is located at the base of the thumb. Then the palm of a hand has a few predominant muscle groups, these are the thenar muscles, the hypothenar muscles and the lumbricales muscle. The tutorial then starts by telling you to round off the thumb and finger. You then have to add some relevant edge loops, followed by extruding and shaping the knuckles on the finger and hand. The next part was one of the hardest parts to do, you duplicate the finger that you have already created three times, you now have all of your fingers so you have saved a lot of time however the hard part is making sure that the vertices of each finger match up with the vertices's on the hand. You have to scale and edit the other fingers slightly to make sure they fit, you then combine the fingers with the hand and merge the vertices. The next step it to create the knuckles on the thumb. I then continued to try and improve the hand by moving the vertices to try and best match the reference images. Overall I am fairly happy with how the hands look but I noticed that some of the fingers are too close together. Unfortunately I do not have enough time to re work the fingers that are too close together but for now they look fine. I think that some of the fingers being too close together will only be problematic if you were to rig this character, other than that I personally think the hands and fingers looks fine. The images below show the finished hand. The images also show the topology of the hand and how the hands match the reference images.


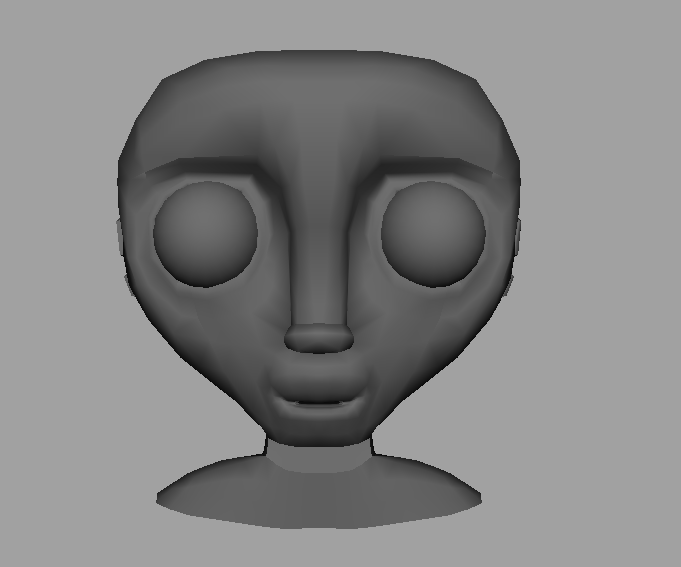
The next section of the tutorial is called 'Finishing the Head'. Just like all the other tutorial titles the title pretty much explains what this part of tutorial covers. This part of the 'Adding Detail' tutorial shows you how to add detail to the head. The tutorial states "The head is one of the most intricate and difficult areas that you will model. The head, more than any other single area is what will make or break a character. If the modeling is not rock solid here, then your character won't have any appeal. The landmarks of the head are the eyes, nose and mouth." With this is mind I wanted to make sure that I created a head that resembled the reference images as best as possible. I have never modeled a face before, the character that I modeled before was wearing a gas mask so it did not need to have a face. So modeling a face was a completely new area for me, which meant I learnt a lot of new information from this part of the tutorial. The tutorial started off by telling me to take some time to adjust and refine the shape of the head by adjusting the edges and vertices. The reason that I had to do this was because the head now contained some new edge loops, these new edge loops had been created because of some of the edge loops that were added to the torso earlier on. Once I was happy with how the head looked the tutorial told me to build up the transition between the torso and the head. I had to add two new edge loops to the trapezius muscle area. I had to make sure to include the slightly concave shape of the trapezius muscle as well as the bony protrusions of the clavicle. So again knowing anatomy helps alot. The tutorial then moved onto working on the neck, followed by the whole process of creating the face. So far so good I was very happy with my progress and did not seem to have any problems. Then I had to create the ear, this was by far the most challenging part of the model. Unfortunately after spending a long time on the ear I had to leave it how it was, this was due to the fact that the deadline for this project is soon approaching. If I had more time however I would have kept on working on the ear and I am sure that I would have got the ear looking exactly as it should. The images below show my finished head, the images also show the topology of my head and how my head matches up with the reference images.


The next section of the 'Adding Detail' tutorial is called 'Creating Clothes'. This tutorial shows how to add detail to the clothes such as the folded bottom of the characters jeans and adding to the characters t-shirt sleeves. I started to follow this tutorial and created the folded bottoms of the characters jeans but unfortunately they needed a lot work, I needed to edit the shape of them and this would take me a long time. Due to the short amount of time left I had to skip this and I skipped the part of the tutorial that showed how to add detail to the characters t-shirt sleeves. However I am still glad that I followed this tutorial because it taught me a new technique. The new technique that I learnt was extruding edges, I already knew that you can extruding faces but I did not know you can extrude edges. Luckily my model looks like he is wearing trousers so I can get away without the bottom of his jeans being folded. However this part of tutorial was still very beneficial despite the result not being on my final model.
The next and final section of the 'Adding Detail' tutorial is called 'Adding Hair'. This part of the tutorial shows you how to add hair to the model, I read this part of the tutorial but again I was running out of time so I skipped it. However as I discovered from the previous ZBrush tutorial that I followed you can sculpt hair into your model very quickly and easily. So I have decided that I am going to take my Game Character model into ZBrush and sculpt some hair into my model. I may also attempt to add the details of the folded bottoms of the charracters jean and try to add more detail to the characters t-shirt sleeves but I will see how difficult and time consuming it will be. I do not think that I will be able to achieve the hair style from the reference image in ZBrush without starting to model the hair in Maya so I am just going to give my game character a more basic hair style. I think that because I have seen the character with hair in the reference image I feel that he looks a bit lifeless without hair. I think that I can't get away with leaving the character with no hair, but I think that taking the model into ZBrush and creating the hair there gives me the opportunity to practice and learn some more about ZBrush. It also mainly gives me the opportunity to practice sculpting.
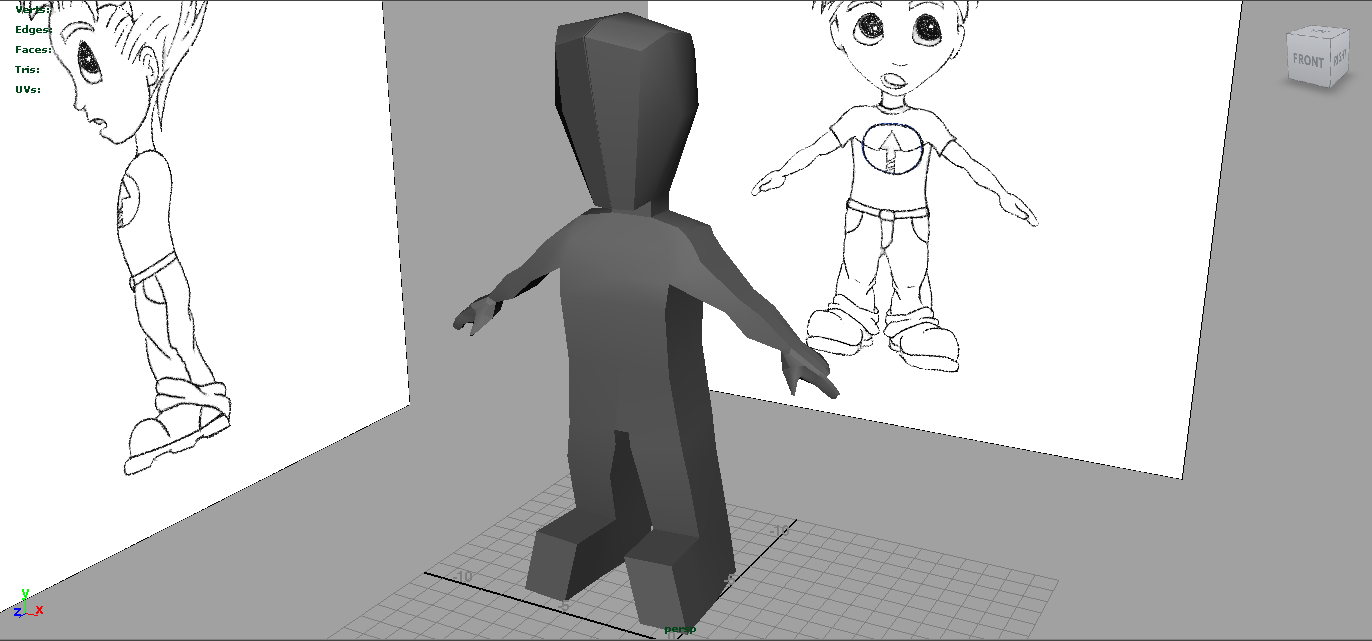
So I have now completed the 'Adding Detail' tutorial which means I now have low-res Game Character model. The images below show my completed Game Character model, the images also show the topology of my Game Character model and how my model matches the reference images.


Overall I am very happy with how this model turned out. I can see that there is still room for improvement and it is far from being the best model in the world but compared to the other character that I have modeled it is miles better. I think that one of the things that I am most happy about is the topology. Topology was something that I wanted to focus on because the topology of the character that I modeled before was awful. I think that this tutorial taught me a lot and I am very glad that I followed it because this is the process of character modeling in Maya that I find hardest to get my head round. I think that is due to the fact that I have not had enough practice with character modeling. This tutorial was perfect as it showed me the process that brings your character to life, it also showed me a logical way of going about adding detail and how important anatomy is when it comes to character modeling. This tutorial also taught me some new basic tools and techniques in Maya that I should already know. The tool that I learnt that is going to be very useful is the 'Split Polygon Tool', I knew that this tool existed but I did not know what it was called where is was located so I just stuck to using the tools that I already knew, this tutorial gave me the opportunity to properly discover it. The 'Split Polygon Tool' allows you split the polygons in your model by drawing in an edge one vertice at a time. The tool is very useful for re-topologising your model. I used this tool a lot when creating the Game Character model in order to rebuild its topology, this was incredibly helpful for the rebuilding the topology of the face and taking out some of the triangle polys on the hand. The image below shows where you can find the 'Split Polygon Tool'.

This tutorial taught me a lot of information and I will definitely be taking the knowledge that I learnt and apply it to help me create character models that I will be creating in future. This tutorial also pointed out something that I definitely need to have some knowledge about in order to create a successful and believable character model. That knowledge is anatomy, the tutorial opened my eyes to how important and useful knowledge of anatomy is. It also made me realize how much it helps when creating characters, especially when creating characters that exist in the world such humans. I think that I am definitely going to take some time in the not so distant future to learn about anatomy as it will help to improve my character modeling. I think one of the most valuable things that I realized from this tutorial is the fact that practice is key. I think that I need to practice character/ organic modeling a lot more in order fully understand it and have the ability to create the best models that I possibly can.
No comments:
Post a Comment