The chapter starts off by explaining what ZBrush is, what it can be used for and why it is used. It then goes through some of the basic hot keys that are used in ZBrush. I found that some of them were similar to Maya which made them easier to remember. The user interface was next explained. I found using ZBrush's interface fairly straight forward and could not wait to start some modeling. There was then a tutorial about saving custom materials. This taught me a lot of new information but at this moment in time it was not relevant as I currently have no custom materials that need saving. However I can see where this will come in handy in the future.
It was the next tutorial where I starting to learn a lot about modeling in Zbrush, this was because it gave me a chance to use the interface further, which made it a lot easier to understand. This tutorial is called 'Using Zspheres'. It starts by explaining what Zspheres are and what they can be used for. It already became apparent to me that Zspheres would be very useful. The Zsphere tutorial goes on to show how to create a human hand from Zspheres. I firstly started creating different sized Zspheres this allowed me to get the hang of how Zspheres work. I then used the book and the video tutorials that come with the book to create a hand out of Zspheres. This didn't take too long but it did require a lot of adjusting to ensure my Zsphere hand matched the one from the image in the book. Below is an image of my Zsphere hand.

I then turned on 'adaptive skin'. This tool changes the Zspheres to a poly mesh. When I did this my hand looked like more of a robotic claw than a human hand. Where as the hand in the image in the book looked like a real human hand. At first this was disappointing as I thought I had done something wrong, but it then became apparent that Jason Patnode had obviously sculpted the poly mesh to create this realistic human hand, it was not a case of him just turning on 'adaptive skin' and that was it, he worked on it to create a finished model. This gave me an insight into the power that ZBrush has.
The next tutorial in the chapter is called 'Exporting a Model from Maya'. This chapter explains how to export a model from Maya and import in into ZBrush. I learnt that in order for this to work the model has to be exported as an .obj file. This made sense to me because that is the file format that I had to export a model as when I had to make a 3D print of the one and only character model that I have ever created.
The tutorial after this was called 'Exporting a Model from ZBrush to Maya'. So this tutorial showed how to get a model back into Maya after using it in ZBrush. This was also very simple again making sure that the model is exported as a .obj file format. The main thing that I learnt here was where the correct export button was located in ZBrush.
The fifth tutorial in chapter 3 is called 'Rebuilding Bad Topology'. I already knew from the title that this technique will come in very handy. The tutorial in the book uses a model that is provided with the book, however I had an idea that would allow me to learn this process better. My idea was to use the process that this tutorial taught (rebuilding bad topology) on the one and only character that had I ever modeled before. I knew for a fact that my model had very bad topology and not just in one area but all over the model. So it seemed the perfect opportunity to improve a model and learn a very useful technique within a new software.I find that sometimes if your just following the tutorial and making sure your results look exactly like the results in the book then your perhaps not learning the process as best as you could be. Where as when your using a different model with different problems you still read and take in what the tutorial is saying but you have to apply it differently therefore requiring you to think about it more which results in you taking in more information. Thats my view on it anyway.
Another benefit from using my own model for this tutorial is it would allow me to use what I learnt in the previous two tutorials. This would also ensure I would solidify my learning because I had only read the previous tutorials, using my own model would allow me to physically carry out the process of exporting a model from Maya and importing it into ZBrush, and then exporting that model from ZBrush and importing it back into Maya so it can be rendered or animated etc. Below is an image of my character model that I am going to export into ZBrush and rebuild some of its bad topology.

As you can see from the image above my character has a lot of props on it, such as the gas mask and helmet etc. The focus of the tutorial that I am following is rebuilding bad topology so these props are not relevant as I am just focusing on the mesh of the character. Luckily my props are all separate meshes and are attached to separate layers in Maya. This meant that all I had to do was hide them and make them unselectable. This then left me with just the mesh of the character. Below is an image of my character without its props.

The image below shows the mesh of my character.

As you can see from the image above the topology of my model is awful (you made need to click on the image to enlarge it so that you can clearly see the mesh). I created this model for my first unit of my second year at Ravensbourne. I can already see from what I have learnt in this unit that the topology is very bad. I think that I have already come a long way since modeling that character and I haven't even begun modeling a new character from scratch yet. I can see that my mesh contains 'ngons' (polygons with more that four sides) so I have broken a main rule of modeling especially character modeling. I also have too many triangles in my mesh. So already I have failed to keep to two of the basic rules of modeling. The mesh in general is just a mess. However I will say in my defense that this was the first ever character that I modeled and in fact thinking of it I think it was the first ever model that I made without following any tutorials and used from my own design. I think this model clearly shows that I did not know much about modeling. In a way I regret that I did not do more research, purchase the book that I am using now and learn some ZBrush back then. That would have meant that I would have been at the stage I am now a year ago and I would now be a lot more advanced in Organic Modeling. However it is what it is and I am learning it now.
I exported my character as an .obj and imported it into ZBrush. I then came across a problem that I was not expecting. Below is an image of the message that poped up when I imported my character into ZBrush.

Due to what the book had taught me about character modeling I understood what this message meant and what it was asking me. Basically as I said in the paragraph above my mesh contained 'Ngons' (polygons with more than four sides) this meant that when I tried to import my character into ZBrush it was not a mesh that ZBrush could work with. Luckily for me ZBrush gave me the option of changing the 'Ngons' to 'Quads and Triangles' or just changing the polygons in the mesh to 'Symmetrical Triangles Only'. I selected 'Quads and Triangles' I could now drag my model into the work area and enter edit mode which now allows me to edit and sculpt on my model. Below is an image of my character model in ZBrush.

As you may notice from the image above my mesh now has some holes in it. I rotated around my character and discovered that there were now also holes in the back of the mesh as well. Below is an image of the back of my character.

There were some more drastic holes in the back of the mesh. This did not take me long to figure out why this had happened. It all came down to the message that poped up when I tried to import my character into ZBrush. This all boiled down to the fact that there were 'Ngons' in my mesh and because I told ZBrush to convert my mesh to 'Quads and Triangles' it meant that some holes were formed in the mesh. Despite not having enough time to rework the whole mesh and fill in the wholes I can still use this mesh for the 'Rebuilding Bad Topology' tutorial. I though that maybe rebuilding the topology of the mesh in ZBrush might get rid of the holes, but unfortunately it didn't. There may be a way to do this but as I am a beginner in ZBrush I am not sure if there is.
I selected a part of the mesh where the topology was exceptionally bad. I ended up choosing the top of the legs where the polygons in the mesh had lots of triangles and some of the edges crossed over each other. Below is an image of the section of the mesh that I am using for the tutorial.

As you can see there is also a hole in this part of the mesh so I thought that by rebuilding the topology of this part of the mesh may take out that hole. I started to follow the tutorial. The first thing that I did was make a clone of my mesh. This is pretty simple it just makes a copy of your mesh. I then created a Zsphere, I needed to do this in order to work with the retopology tools. I then clicked 'Rigging' and selected my original mesh. This means that the Zsphere will now be drawn on top of my mesh. The next thing that I did was click on 'Topology', I then got a drop down list I then clicked ''Select Topo' and picked the cloned mesh in the popup. This is all found under the 'Tools' section. I then clicked on 'Topology' and then clicked 'Edit Topology' this put me in editing mode. A wireframe of my topology was now wrapped around my mesh. I can now rebuild the entire topology of my mesh by erasing and recreating the lines of my mesh.
The tutorial then told me I had to turn on 'Symmetry'. This meant that what ever action I carried out on one side of the mesh the other side of the mesh would also be effected in exactly the same way. This ensures that your whole mesh stays symmetrical. I turned on 'Symmetry' by clicking 'Transform' then clicking 'Activate Symmetry' and turned on the 'X Symmetry'. I was now ready to start erasing and rebuilding the bad topology of my model. You erase the bad topology by pressing 'Shift' and clicking and dragging the 'Left Mouse Button' across the faulty sections of the mesh and it erases the current topology. This took a lot of getting use to and took me a while to fully get the concept. However once I started to get the hang of it it proved to be a tool that is going to be very useful in the future. I removed the bad topology of the section that I was working on, below is an image of the result.

As you can see I removed all of the triangle polys in my mesh. It was now time to rebuild the topology, this time making sure that the new polys were quads and not triangles. The tutorial taught me that you rebuild the topology in the same that you erase it, except this time you don't click and drag with the left mouse button you only click it. So what you do is you press 'Shift' and click and release the left mouse button on the point where you want to begin creating the new topology. You then press 'Shift' and click and release the left mouse button on the end point of where the new topology is going to end. This also took me a while to get the hang of and required a lot of trial and error, but in the end I finally got there. I continued to do this and rebuilt the whole section of the mesh that I had selected to re work. I payed a lot of attention in ensuring that I created proper edge loop topology. Below is an image of my rebuilt topology.

As you can see unfortunately there is still a hole in the mesh however the topology is now a lot better. The polys are no longer triangles and are now quads. I found that this function of rebuilding topology within ZBrush was extremely useful. Once I got the hang of it, it was a very quick and effective way. I could now go on to improve the topology of my whole character but I think that it would be a waste as the mesh of my character is beyond repair, it would be easier for me to start from scratch. Despite saying that it was very useful having this model as it was a perfect example that I could use in order to learn the technique of rebuilding bad topology. I think that this will definitely come in handy in the future and is a technique that I will always have in mind when I need to rebuild bad topology.
The chapter then covers two more tutorials. The first tutorial is called 'Using HD Geometry'. This tutorial shows how you can work on models that have a poly count that is too high for my computer to normally handle. This is a technique that will come in very handy when I start to create some very high detail models. However at this moment in time it is something that I do not need to use, but I image it will not be long before I do so it is definitely worth knowing.
The second tutorial is called 'Using Smart Resym'. This turorial covers how you can regain symmetry in your model if you have only been working on one half with out symmetry activated. This again is very useful but you only tend to lose symmetry in your model if you are using 'HD Geometry'. So I have not put this technique into use but I have no doubt that I will need to in the future.
The book also provides a disk with additional video tutorials for some of the chapters and the files that contain the content that all the tutorials are using. There are 6 video tutorials for chapter 3. The first video tutorial is about the basic brushes that you can use in ZBrush. This taught me about basic sculpting technique such as not having your 'Z intensity' too high and layering on brush strokes instead of just having your 'Z intensity' as high as you can and just using one brush stroke and leaving it. If you layer on your brush strokes with less 'Z intensity' and keep building them up you have more control over how the sculpted area will look. This video also taught me about the basic brushes that you can use to sculpt. I found this very interesting as it allowed me to experiment with some of the different effects that you can create. I also learnt how to change the size of your brush and the size of the area that the brush will effect. I learnt how to wrap a brush around a whole model, this is a technique that is very useful for create scales on your model. Another technique that I learnt turns up the gravity of your brush so what you are sculpting gets pulled down. This is a technique that is very useful for sculpting rolls of fat on more obese characters. I also learnt a useful technique called 'Lazy Mouse'. You find this under the 'Stroke' menu, 'lazy mouse' allows you to drag your mouse and the sculpting of your model will update behind your stroke. This makes it a lot easier to control the path of your mouse and allows you to see the exact area of the model that you are effecting. Below are images that show you where you can change the 'Z intensity' and brush sizes, where you can turn up the gravity of your brush and where you can find 'ZBrush's Lazy Mouse' feature.


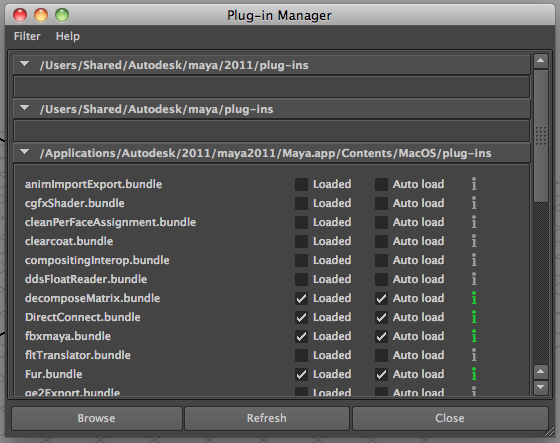
The second video tutorial quickly explains how to export your model from Maya as a .obj file if you do not have the option of exporting as an .obj. As the video tutorial explains you resolve this problem by loading the .objExport plug-in in your 'Plug-in Manager' in Maya. You simply open up the 'Plug-in Manager' and tick the boxes 'Load' and 'Auto Load' which are located next to '.objExport' and you will now be able to export your model as a .obj, because you clicked 'Auto Load' this plug-in will now always be loaded when you open up Maya so you do not have to keep going into your 'Plug-in Manager' and loading the .objExport plug-in every time you want to export a model. The first image below is an image of the 'Plug-in Manager' and the image below that is an image of the two boxes that you need to tick.
The third video tutorial shows you how to import your model into ZBrush, the book also did a good job of explaining this so the video tutorial compliments the 'Import a model into ZBrush' tutorial from the book. The images below show you where to click to import a model into ZBrush.


The fourth video tutorial is called 'ZBrush Overview', this tutorial shows you a little bit of all the basics. It taught me about how to 'Mask' a certain section of your model, this allows you to only see the masked part of your model which allows you to focus closely on that chosen part. This video tutorial also taught me how to 'Smooth'. You do this by holding the 'shift' button on the keyboard when using a brush, you can smooth any part of the model. This is very useful if you have gone too far with your sculpting but do not want to undo all of your changes, you can simply smooth it out. The smooth tool adds more 'pixols' to your model. However as soon as you let go of 'shift' your brush returns to its original purpose.
The fifth video tutorial is an introduction to using 'Zspheres' I had already picked up most of this knowledge from previously following the tutorial on how to create a hand from Zspheres. The last video tutorial accompanies the tutorial in the book on how to make a human hand from Zspheres. If only I had watched this video tutorial when making my hand out of Zspheres I would have had a much better result. However by trying to create a hand from Zspheres from the little text in the book and not realising that there was a video accompanying it I learnt a lot more as I had to experiment more. Below is an image of a shape that I created out of Zspheres.

Overall so far this chapter of the book has taught me the most, that is probably heavily down to the fact that I have never used ZBrush before so any ZBrush knowledge is new knowledge to me. I am finding that I am throughly enjoying learning ZBrush and it is a piece of software that is going to be very useful especially for Character Modeling. I feel that I am starting to grasp some of the basics but I want to develop this further. At the end of Chapter 3 it is suggested that you look at the 'Pixologic' website as it has a lot of video tutorials and critiques. This is my next aim in order to develop my basic knowledge of Zbrush. Once I have done this I will return to the next chapter of the 'Character Modeling with Maya and ZBrush: Professional Polygonal Modeling Techniques' book.
No comments:
Post a Comment