Overall I am very disappointed that I did not manage to finish the wolf model in time for the deadline of this unit. However I still have time to finish the model over the Christmas holiday. Despite the model not currently being finished I can see that when finished it is going to be a piece of work that is more than worthy of going in my showreel. I feel that it is the best character model that I have ever done and will definitely finish it and put it into my showreel. I also intend to go back and finish the tutorials from the 'Character Modeling with Maya and ZBrush: Professional Polygonal Modeling Techniques' book as I think there is still a lot that I can learn from there. I will also follow all of the other ZBrush tutorials on the Pixologic website. I will be looking into getting a book that teaches sculpting in ZBrush. One thing that I have certainly realised from this unit is how useful books can be compared to some of the tutorials that you can find on the internet.
I set myself three main aims for this project. The first aim that I set myself was to learn and understand the process of organic/ character modeling. I think that I have achieved this. I now no longer struggle when it comes to modeling a character, I still find it challenging at times but thats one of mains reasons I enjoy modeling so much. I enjoy the challenge of trying to build something in 3D. The second aim of my project was to learn the basics of ZBrush. I think that I have also achieved this aim. I think that I have moved passed the basic stage and am ready to advance my ZBrush skills. I feel confident that I know what I am doing in ZBrush and where most of the basic tools are located so perhaps it is time for me to push myself and try to learn some of the more advanced features of ZBrush. I still have a lot to learn in ZBrush but I know that it is a very complex piece of software and that is why I only set myself the task of learning the basics, so that I could build a foundation of knowledge and now I can build on that. The third task that I set myself was to create a completed character model for my showreel. Unfortunately I did not complete this. The reason that I did not complete the wolf model in time for the project deadline is because of my poor time management. I found that because I had to juggle between three projects I found it difficult to split my time up evenly which meant that each project was effecting each other in a sense that I was spending more time on one project and the more time on another project and vice versa which meant I fell slightly behind at times. However I have learnt my lesson and this will not happen again. All in all I really enjoyed this project I found that I thoroughly enjoyed using ZBrush and will be using it a lot more in future. Plus its always helpful to know more than one software. This project also helped me to developed my modeling skills to a higher standard which will help me on other projects such as the short film we are currently making. Now that the project is finished I am aiming to use the knowledge that I learnt from this unit to help me model several characters in my spare time that I can then put into my showreel.
Thursday, 1 December 2011
Adding Detail
It was now time to put everything that I have learnt from the adding detail tutorial from the 'Character Modeling with Maya and ZBrush: Professional Polygonal Modeling Techniques' book to good use. I now began to add detail to the wolf I started by adding detail to the torso of the wolf. One of the things that the adding detail tutorial from the book taught me was to edit all angles of the model as I go along. So I was being extremely careful when adding new edge loops to edited each part of the model that edge loop effected from each angle. This is the part of character modeling I find most difficult. I find that this stage either makes or breaks your model. I found adding detail to the torso fairly easy but adding detail to the paws was a lot more challenging. However the most challenging of them all is what I am currently working on now and that is adding detail to the head. One of the reasons that I am finding this so difficult is because when looking at the head in x-ray mode in the front view you have all the vertices of the torso behind it so it makes it a lot harder to establish what vertices are the vertices of the head and what vertices are the vertices of the torso.
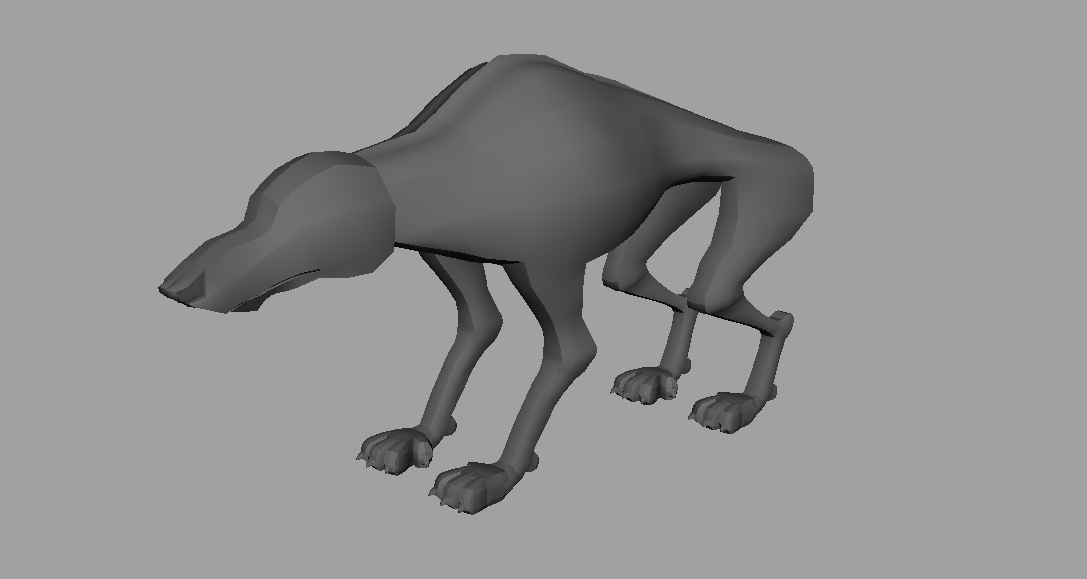
Unfortunately I have not finished the model. However I am very close, I am currently working on the head and then when that is finished all that I need to do is to make some adjustments to body and model the tail. The images below show what my model looks like so far and its topology.


Overall I am very happy with how my model is turning out. It stills need quite a bit of work but I am getting there. I think the front of my model needs a lot of work done to it. I really like the side view of my wolf I think that Ive got that perfect. If I view my model in smooth preview mode then I am very happy with how my model looks. I have no doubt that once I have finished the head, modeled the tail and done some general tweaking, then smooth the model it will be of a good enough standard to put in my showreel. Even though I have not finished my model I think that it is one of the best models that I have ever done. The images below show what my model currently looks like when it is viewed in smooth preview mode.


Blocking Out
It was finally time to put everything that I have learnt about character modeling to good use. The first stage of modeling a character is 'Blocking Out'. This is where you create a ruff outline of the shape of your model. So you are create a ruff block model of your character. You then move onto adding detail. But before I can start 'Blocking Out' I need to set my scene. I imported the reference images into my scene. The image below shows my reference images in my scene.

Before 'Blocking Out' I thought that it would be a good idea to have a quick look at the anatomy of a wolf. I did this so I could get an idea of the main bone and muscle masses that should appear on my model. This sort of information needs to be included in the block out otherwise these features would never feature on the model. The closer I stick to the real anatomy of a wolf the more believable my character and model will be. However because I have gone for a 'cartoony' style I have given myself some leeway but still the closer I stick to the actual anatomy of a wolf the better my model will look. I found two perfect images that gave me an idea of what the anatomy of a wolf looks like. The first image below shows how the wolfs skeleton effects the shape of its body. The second image below shows the muscle anatomy of a wolf.


Now that I had the anatomy of a wolf in mind it was finally time to start blocking out. I found that this did not take too long, I stuck to the reference and used the anatomy images above as guidelines. Which meant that I ended up with a block out that I was very happy with. I could now move onto the next stage of adding detail. The images below show the block out of my wolf and its topology.


Now that I had completed a ruff block out the wolf it was time to add detail.
The Plan
So I have now designed my wolf and have the reference images which means I am now ready to start modeling. Before I start modeling I have come up with a workflow. I am going to model the wolf to a reasonably high detail in Maya. I am then going to take the wolf model and import it into ZBrush where I will sculpt the fur onto the model and add some higher detail, I will also try to add more detail to the face of the wolf. I will rebuild any bad topology in ZBrush as this is a new technique that I learnt and would like to put my new knowledge to use. I am also considering Polypainting to texture the wolf. I am considering Polypainting the wolf because this was something that I recently learnt the basics of and found very interesting. I found that it is a completely different texturing process compared to what I am use to. Hopefully by Polypainting the wolf I will learn more about Polypainting and will hopefully get a different texturing style compared to the texturing style that I usually get from texturing in Adobe Photoshop. In the future I may look into removing the sculpted fur and learning and applying hair dynamics to my wolf model to try and create the fur. I think that this would really bring the wolf to life.
Character Concept
It was now time to come up with a character that I could then model. The aim was to create a unique character that would stand out and make sure that I modeled it to a high enough standard so that it was good enough to go into my showreel a really show off my modeling skills. At first I was thinking about the character being a human and just making sure that he/ she had characteristics that stood out. I wanted to make sure the were characteristics that stood out for two reasons, the first being I wanted to challenge myself when modeling and the second reason being I wanted the model to stand out and be different.
However I recently attended a Visual Effects Masterclass Ravensbourne. The masterclass was about Creature Animation. It was made apparent that there is quite a demand in industry for creature animation. It was then pointed out to me that why should I play it safe and just stick with a human character, I could play on this fact that there is a demand for creatures in the Visual Effects industry and use it as a tool by including it in my showreel. So I started to think, I thought that although feeling a lot more comfortable with character modeling and wanting to push myself I do not want to over do it and do anything too complex because the aim is for the model to be of a high enough standard so that it can be put into my showreel and be shown to people in industry. So I started to think what if the character that I came up with was to be an existing animal who's anatomy was not too complex. I started to go through some different ideas of animals and started to look at some drawings of them. After a lot of looking around at images of different animals I stumbled across some images of wolves. I then decided that I quite like the look of Wolves. Some of the images that I viewed made me feel that their is a very interesting type of character that comes with Wolves, I felt that they often look like they are quite sneaky and up to no good, they look like they have a bit of a temper on them and can be very dangerous, but then they have an appealing factor that makes you feel as though they can be trusted. So just by looking at some images I had got an idea of what type of character a Wolf is. From then on I was set, I decided that I am going to model a Wolf! The images below are some of my favourite images that inspired me to want to make my character a wolf.


I really like the pose in the image above and am thinking about having my wolf model posed in a similar way in my showreel.

I really like the colours wolf in the image above, especially the colour of the eyes. I am considering a similar colour scheme for my wolf.

I was thinking that perhaps making my wolf look different to your standard wolf. I still want to include the normal wolf features but was maybe thinking about have my wolf quite skinny so you can see the bone structure. The image above shows a look that I might go for.

In the image above I really like the scar above the eye. So again I am looking into maybe having my wolf look like he has been in a few fights.

After deciding upon making a wolf I thought that wolfs are animals not creatures so I was thinking that maybe when designing the wolf I could make him look more creature like. I still want it to be apparent that it is a wolf but if it is more creature like it will hopefully make it look more unique. So now that I had decided that I am going to model a wolf it was time to design the wolf and create the reference images or a model sheet that I could model from. For this task I wanted to use a stronger drawer than myself as I felt that I lacked the constancy of drawing the same character from all different angles. I think if I drew the different views of the same wolf them it would look like 4 different wolves. So I hunted my class for a talented artist. I had seen some of Niko Sierra's (fellow Ravensbourne student) concept artwork on Facebook and decided that I liked his drawing style, so I asked Niko if he would like to draw my wolf for me. He agreed and we started to talk about how I wanted the wolf to look. I explained that I wanted the wolf to look stylistic, look a bit creature like, and have a more 'cartoony' style. Niko showed me a lion design that he drew a while back just to see if that was a kind of style I would be interested in having for the wolf. I really liked the lion design and felt that that style kind of fitted with what I had in mind for what the wolf was going to look like. Niko started to draw some ruff shapes for the wolf and after going through a few different body shapes, I decided upon the one that I preferred the most. Niko then developed some more advanced designs of the wolf and I picked bits from some of the different designs and said can you put those bits together and thats what he did and we ended up with a wolf design that I couldn't wait to model. The images below show the final design for my wolf.


Niko also kindly drew me the wolf without fur so that I could get a better idea of the shape of the wolf when modeling. The image below is the image of the wolf without fur.

As you can see we made the wolf look kind of creature like, when looking at the wolf I sometimes think that it looks a bit like a werewolf. The wolf looks stylistic and has a 'cartoony' feel which is exactly what I wanted. We also made him look skinny and you can see some of the bony masses which makes him stand out from your average wolf. All in all Niko did a very good job, I appreciate his help and am really happy with how the wolf looks. Now its time to get modeling!
The Remainder of the Book
It was now time to head back to completing Jason Patnode's 'Character Modeling with Maya and ZBrush: Professional Polygonal Modeling Techinques' book. However I noticed that the deadline for this project was now fast approaching and the aim is to create a high standard character that I can put in my showreel. So I decided to skip the remanding chapters and tutorials of the book. Luckily there were only four chapters left for me to read so really I'm not missing too much.
The first chapter that I am skipping is a chapter called 'Creating a Hyperreal Character'. This chapter is a very long tutorial showing you how to make a monster type character. I already had an idea at the beginning of the project that I would be skipping this tutorial as it showed the same tools and techniques that the creating a Game Character tutorial did. So I gathered that I would not be learning too much new information and could spend this time learning a lot of new information, and also use the time that I gained to create the character for my showreel.
The next chapter that I am skipping is called 'Creating a Photo-Real Character' this chapter contains a series of ZBrush tutorials that help to create a photo-real character. I was very reluctant to skip this chapter as it contained a lot of new information that I did not know that could have helped me such as a tutorial that shows how to sculpt clothes and hair. It also had a tutorial that shows how you can pose your character in ZBrush. I think that that would be a very useful technique. However this chapter did cover some topics that I had already learnt such a sculpting using layers. Unfortunately despite wanting to follow these tutorials I do not currently have time. I will definitely be following these tutorials as soon as I have the time as I think I will gain some vital knowledge from them.
The third chapter from the book that I am skipping is called 'UVs and Texturing'. Luckily I know about all of the topics that this this chapter covers. This chapter includes three tutorials. The first shows an overview of UV mapping, I have had plenty of experience UV mapping and consider myself to know a fair bit about it. After reading this tutorial I discovered that it covered no new grounds for me. The second tutorial that shows how to texture in Adobe Photoshop and then apply that texture to your model in Maya. Again this was a topic and process that I already knew how to do, and again after reading this tutorial I discovered that gave me no new knowledge. On the other hand the last tutorial was about Polypainting in ZBrush, I had already followed a tutorial that taught me the basics about Polypainting but I would have liked to have followed this tutorial as I believe it would help to develop my Polypainting knowledge. As soon as I get the opportunity I will be following this tutorial. So overall I was not missing out on too much by skipping this chapter.
The last chapter that I am skipping and the final chapter of the book is called 'The Next Step'. This chapter contained tutorials that covered how to create a Normal Map in Maya, how to create a Normal Map in ZBrush, Creating a 16-bit Displacement Map and a 32-bit Displacement Map in ZBrush, Rendering with Maya Software and Rendering with Mental Ray, creating a Turntable in Maya and creating Wireframe Renders in Maya. I had rendered with Maya Software and Mental Ray on several occasions before so I knew about those two processes. However I knew nothing about creating Normal Maps and Displacement Maps and this looked like a topic that could be very useful. I consider these two topics to be knowledge that I should know about. I was not sure how to create a Wireframe Render as I had never done one before but I know that I need to include Wireframe Renders of my models in my showreel. I was also unaware that Maya has a built in Turntable function and I need to include turntables of my models in my showreel so this technique would be very useful. When creating a turntable of my models I would usually just manually rotate my model and set the keyframes to dictate how fast or slow the timetable is and then render it out. However I think that the Turntable feature that Maya has to offer will offer more constancy to my showrell because if I keep my setting the same then all of the turntables in my showreel will be the same speed. I think that this will help to make my showreel look more professional. So skipping this chapter means that I am will be missing out on a lot of valuable information but I decided that the most important thing at the moment is to begin creating my character model for my showreel. If I create the model for my showreel quicker than I estimated then I will definitely return to these chapter of the book that I skipped, and I will certainly return to this chapter as I think that I will benefit a lot from the information that this chapter contains. If I do not have enough time to return to these chapters before this unit finishes then I will be returning to these chapter's regardless as I think the information that they contain will help me in future.
Overall I think that buying the 'Character Modeling with Maya and ZBrush: Professional Polygonal Modeling Techniques' book was one of the wisest things that I have done whilst studying Animation. I personally found that this book has been the best tool for learning character modeling. I think that since reading this book and following its tutorial my character modeling ability has improved drastically. I now feel that I have a lot more knowledge about character modeling and think that I am finally at the stage where I can start modeling a character without the help of a tutorial.
Wednesday, 30 November 2011
Adding Hair To The Game Character Model
I have now got a completed Game Character Model, however he did not have any hair, because I am now running out of time I decided to skip the part of the tutorial that showed how to add the hair. The reason that I decided to skip this part of the tutorial was because it looked very time consuming. However I felt that the model definitely needed hair, I think that hair would add more life to the model.
So I started to think about how I could quickly add some hair. I also wanted to create some hair using a process that would develop my knowledge. This seemed like a perfect opportunity to practice some of the ZBrush knowledge that I had picked up over this project and practice sculpting. So I exported the model from Maya and imported it into ZBrush. The image below shows how my Game Character Model looked in ZBrush.

I then added some sub divisions so that I could sculpt a higher lever of detail onto the model. You add subdivisions by holding 'ctrl' or 'cmd' on the keyboard and then pressing 'D' on the keyboard. Every time you press 'D' on the keyboard whilst holding the 'ctrl' or 'cmd' key you add a new sub division to your model. So I added a few subdivision levels to my model, the image below shows what my model now looks like with more sub divisions.

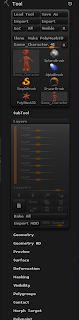
I then began sculpting some hair onto my model. I found that for shaping the hair I worked on the lowest sub division level of my model. For sculpting the detail of the hair I worked on the models highest sub division level. So I found working with the sub division levels that I had created allowed to me quickly sculpt some hair. You change what level of sub divisions of your model you are working with by using the 'SDiv' slider in the 'Geometry' sub palette. If you are drastically changing the base shape of your model then it is best to do this in the lowest sub division level, if you are sculpting a specifically high level of detail onto your model then you need to do this in the highest subdivision levels. The images below show where you can find the 'SDiv' slider in the 'Geometry' sub palette and what the 'SDiv' slider looks like. Once you have a completed model you can delete all of the lower sub divisions by pressing the delete lower sub division level button. This button is called 'Del Lower' and is located below the 'SDiv Slider'. You can also delete the higher sub division levels by pressing the button called 'Del Higher' which is located next to the 'Del Lower' button.


Another technique that I used was when sculpting the hair onto my model was sculpting using layers. This allowed me to experiment with trying to sculpt some different hairstyles onto my model with out effecting the mesh of my model. I was no longer using the reference image for the hair so using layers allowed me to sculpt some hairstyles and use trial and error to finally come up with a hair style that worked well with the model and looked decent. You create layers in the 'Layers' sub palette in the 'Tool' palette. The 'Layers' sub palette is where you create new layers, delete unwanted layers, and bake your layers so that what you have sculpted is added to your model permanently. You can also turn the visibility of layers information on and off. The image below shows you where you can locate the 'Layers' sub palette and what the 'Layers' sub palette looks like.


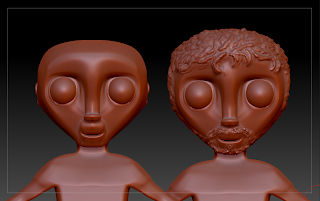
I used a mixture of brushes and kept changing the brush size and Z intensity when sculpting the hair. Two of the brushes that I found most effective were brushed called 'ClayTubes' and 'Rake'. I found that 'Rake' was a really good brush for adding the effect of the different dirrections of hair. After a while I finally got a result that I was happy with. I then started to experiment a bit more and added a beard to my Game Character. Once I had done this I decided that I liked my Game Character model with a beard. I felt that the hair and the beard added more life to the model. The images below show what my model now looks like.


I then though that it would be a good idea to look at my Game Character model with hair and a beard next to my Game Character Model without hair and a beard to see if the hair did make a difference. At first I looked at the models alongside each other in ZBrush, then I thought it would be a good idea to see how my Game Character model with hair and a beard now looked in Maya. So then I imported my Game Character model with hair and a beard into Maya and compared whether the hair and beard did make a difference to my character. The images below show my first Game Character model next to my Game Character model with the beard and hair sculpted on both in ZBrush and Maya.


By importing my Game Character model with hair and beard I got a real insight into how different Maya and ZBrush are from one another. This helped me to understand how ZBrush' Pixol system works, as in ZBrush if I rotated the model with beard and hair it would rotate as fast as I wanted but in Maya if I rotated that same model Maya would lag and it took a lot longer to just imply move the model. Of course I understand that if I were trying this on a really powerful computer Maya would have coped just the same as ZBrush. But this process helped me to gain a greater understanding and start to notice some of the key deifference between the two softwares and which one is best for certain tasks.
Overall I really happy that I skipped the adding hair tutorial and decided to use my own creativity to create some hair in ZBrush. This allowed me to practice sculpting and the more you practice the better you get, so this was very valuable. This also allowed me to learn about some brushes and greatened my understanding of working with different sub division levels and sculpting using layers. I personally think that my Game character looks a lot better with hair and beard and that those feature bring the character to life. Whilst sculpting some hair thought it might be a good idea to searched for some hair sculpting tutorials on the internet to see what was the best way of going about it.I found a couple of tutorials on this but I did not use any of them because I felt that my ZBrush knowledge was more than capable of sculpting some hair onto my model. I also wanted the freedom to experiment and not have to follow a tutorial step by step. However I did find a tutorial that I definitely want to go back to as it could be useful in the future. The tutorial showed how to sculpt hair onto a model and then use Zspheres to make strands of hair that lie on top of the sculpted hair to make the hairstyle look more realistic. I am very glad that I found my own way of sculpting hair onto my model instead of following a tutorial because I think that I learnt more this way, I also think that it allowed me to add my own creative touch to the model, it allowed me to put what I have learnt about ZBrush to use and allowed me to practice my sculpting skills. I personally found that sculpting hair in ZBrush was a much quicker and easier way than modeling hair in Maya. However I think that I am starting to discover a new preferred way of working. I prefer to firstly start by modeling in Maya and get the model to a fairly detailed stage and then switching over to ZBrush to add any high detail to that model.
So I started to think about how I could quickly add some hair. I also wanted to create some hair using a process that would develop my knowledge. This seemed like a perfect opportunity to practice some of the ZBrush knowledge that I had picked up over this project and practice sculpting. So I exported the model from Maya and imported it into ZBrush. The image below shows how my Game Character Model looked in ZBrush.

I then added some sub divisions so that I could sculpt a higher lever of detail onto the model. You add subdivisions by holding 'ctrl' or 'cmd' on the keyboard and then pressing 'D' on the keyboard. Every time you press 'D' on the keyboard whilst holding the 'ctrl' or 'cmd' key you add a new sub division to your model. So I added a few subdivision levels to my model, the image below shows what my model now looks like with more sub divisions.

I then began sculpting some hair onto my model. I found that for shaping the hair I worked on the lowest sub division level of my model. For sculpting the detail of the hair I worked on the models highest sub division level. So I found working with the sub division levels that I had created allowed to me quickly sculpt some hair. You change what level of sub divisions of your model you are working with by using the 'SDiv' slider in the 'Geometry' sub palette. If you are drastically changing the base shape of your model then it is best to do this in the lowest sub division level, if you are sculpting a specifically high level of detail onto your model then you need to do this in the highest subdivision levels. The images below show where you can find the 'SDiv' slider in the 'Geometry' sub palette and what the 'SDiv' slider looks like. Once you have a completed model you can delete all of the lower sub divisions by pressing the delete lower sub division level button. This button is called 'Del Lower' and is located below the 'SDiv Slider'. You can also delete the higher sub division levels by pressing the button called 'Del Higher' which is located next to the 'Del Lower' button.


Another technique that I used was when sculpting the hair onto my model was sculpting using layers. This allowed me to experiment with trying to sculpt some different hairstyles onto my model with out effecting the mesh of my model. I was no longer using the reference image for the hair so using layers allowed me to sculpt some hairstyles and use trial and error to finally come up with a hair style that worked well with the model and looked decent. You create layers in the 'Layers' sub palette in the 'Tool' palette. The 'Layers' sub palette is where you create new layers, delete unwanted layers, and bake your layers so that what you have sculpted is added to your model permanently. You can also turn the visibility of layers information on and off. The image below shows you where you can locate the 'Layers' sub palette and what the 'Layers' sub palette looks like.


I used a mixture of brushes and kept changing the brush size and Z intensity when sculpting the hair. Two of the brushes that I found most effective were brushed called 'ClayTubes' and 'Rake'. I found that 'Rake' was a really good brush for adding the effect of the different dirrections of hair. After a while I finally got a result that I was happy with. I then started to experiment a bit more and added a beard to my Game Character. Once I had done this I decided that I liked my Game Character model with a beard. I felt that the hair and the beard added more life to the model. The images below show what my model now looks like.


I then though that it would be a good idea to look at my Game Character model with hair and a beard next to my Game Character Model without hair and a beard to see if the hair did make a difference. At first I looked at the models alongside each other in ZBrush, then I thought it would be a good idea to see how my Game Character model with hair and a beard now looked in Maya. So then I imported my Game Character model with hair and a beard into Maya and compared whether the hair and beard did make a difference to my character. The images below show my first Game Character model next to my Game Character model with the beard and hair sculpted on both in ZBrush and Maya.


By importing my Game Character model with hair and beard I got a real insight into how different Maya and ZBrush are from one another. This helped me to understand how ZBrush' Pixol system works, as in ZBrush if I rotated the model with beard and hair it would rotate as fast as I wanted but in Maya if I rotated that same model Maya would lag and it took a lot longer to just imply move the model. Of course I understand that if I were trying this on a really powerful computer Maya would have coped just the same as ZBrush. But this process helped me to gain a greater understanding and start to notice some of the key deifference between the two softwares and which one is best for certain tasks.
Overall I really happy that I skipped the adding hair tutorial and decided to use my own creativity to create some hair in ZBrush. This allowed me to practice sculpting and the more you practice the better you get, so this was very valuable. This also allowed me to learn about some brushes and greatened my understanding of working with different sub division levels and sculpting using layers. I personally think that my Game character looks a lot better with hair and beard and that those feature bring the character to life. Whilst sculpting some hair thought it might be a good idea to searched for some hair sculpting tutorials on the internet to see what was the best way of going about it.I found a couple of tutorials on this but I did not use any of them because I felt that my ZBrush knowledge was more than capable of sculpting some hair onto my model. I also wanted the freedom to experiment and not have to follow a tutorial step by step. However I did find a tutorial that I definitely want to go back to as it could be useful in the future. The tutorial showed how to sculpt hair onto a model and then use Zspheres to make strands of hair that lie on top of the sculpted hair to make the hairstyle look more realistic. I am very glad that I found my own way of sculpting hair onto my model instead of following a tutorial because I think that I learnt more this way, I also think that it allowed me to add my own creative touch to the model, it allowed me to put what I have learnt about ZBrush to use and allowed me to practice my sculpting skills. I personally found that sculpting hair in ZBrush was a much quicker and easier way than modeling hair in Maya. However I think that I am starting to discover a new preferred way of working. I prefer to firstly start by modeling in Maya and get the model to a fairly detailed stage and then switching over to ZBrush to add any high detail to that model.
Subscribe to:
Comments (Atom)